Many apps use the payment gateway features but the integration of this payment gateway is a difficult task in Android applications.
So to make this task simple and easy Razorpay have provided a service with the help of this we can integrate the payment solutions in our app very easily and we can also manage all payment methods in our app.
In this article, we will take a look at the implementation of a payment gateway in our Android kotlin app.
You can integrate less time and minimum code.
Prerequisites
- Create a Razorpay account.
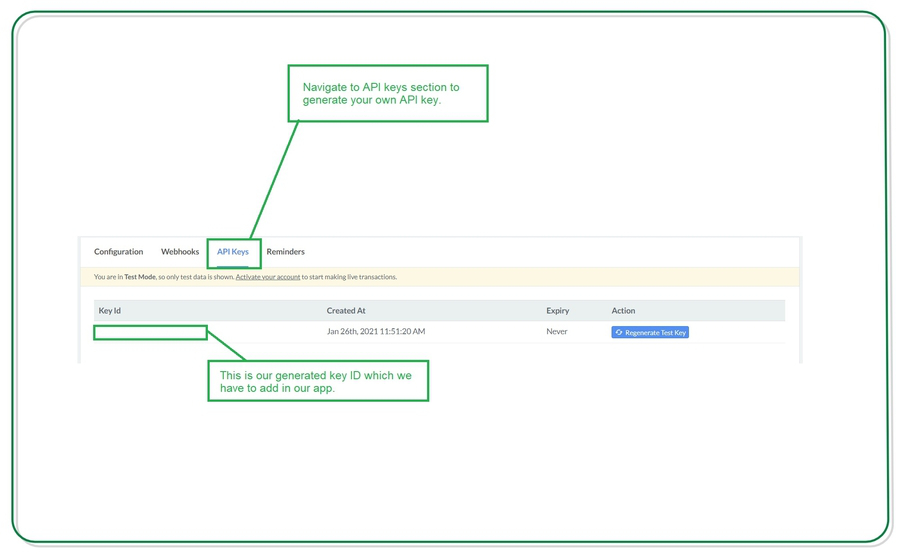
- Generate the API Keys from the Razorpay Dashboard. To go live with the integration and start accepting real payments, generate Live Mode API Keys and replace them in the integration.
- Know about Razorpay Payment Flow.
..
Step 1: we have add a dependency build.gradle:
    // RazorPay
    implementation 'com.razorpay:checkout:1.6.26'
..
Step 2: Adding permissions to the Internet
<uses-permission android:name="android.permission.INTERNET" />..
Step 3: Working with the activity_layout.xml file
Just add button.
 <com.google.android.material.button.MaterialButton
            android:text="Buy Now"
            android:contentDescription="Buy Now"
            android:layout_gravity="bottom|end"
            android:layout_weight="1"
            app:icon="@drawable/ic_baseline_payments_24"
            android:letterSpacing=".1"
            android:textAppearance="@style/TextAppearance.AppCompat.Subhead"
            android:layout_width="wrap_content"
            android:layout_height="match_parent"
            android:id="@+id/fabBuyNow"
            android:layout_margin="5dp"
            app:backgroundTint="@null"
            android:background="@drawable/gradient_payment"
            app:rippleColor="@color/white"
            app:elevation="20dp"
            app:iconTint="@color/white"
            android:textColor="@color/white"
            />
..
Step 4: Generating an API key for using Razorpay
Browser the Razorpay site in Google or you can click on the link here. After clicking on this link you simply have to signup with your email and password and add some basic information such as your phone number.
Here we are creating a testing credential for using Razor Pay.
Inside the setting screen, click on Create a new key option your key will be generated. We will be using key ID in our application to test Razor pay.
The key-id will start with rzp_test
Step 5: In our fragment or activity, try this below code
Initiate Payment and Display checkout Form
I am using a two function startPayment and listener . I have use startPayment function our details. We have use a your need.
package com.shopping.cart.ui

import android.annotation.SuppressLint
import android.app.Activity
import android.os.Bundle
import android.view.LayoutInflater
import android.view.View
import android.view.ViewGroup
import android.widget.Toast
import androidx.fragment.app.Fragment
import com.razorpay.Checkout
import com.razorpay.PaymentResultListener
import com.shopping.cart.databinding.FragmentDetailsBinding
import org.json.JSONObject
import kotlin.math.roundToInt


class DetailsFragment : Fragment(), PaymentResultListener {

    private var _binding: FragmentDetailsBinding? = null
    // This property is only valid between onCreateView and
    // onDestroyView.
    private val binding get() = _binding!!

    @SuppressLint("SetTextI18n")
    override fun onCreateView(
        inflater: LayoutInflater, container: ViewGroup?,
        savedInstanceState: Bundle?
    ): View {

        _binding = FragmentDetailsBinding.inflate(inflater, container, false)

        // adding on click listener to our button.
        binding.fabBuyNow.setOnClickListener {
            savePayments(500f,requireActivity())
        }
        return binding.root
    }


    override fun onDestroyView() {
        super.onDestroyView()
        _binding = null
    }

    private fun savePayments(amount: Float, context: Activity) {
        val checkout = Checkout()
        checkout.setKeyID("rzp_live_7rk7sJYf7JnVOk")
        try {
            // rounding off the amount.
            val amountValue = (amount * 100).roundToInt()

            val options = JSONObject()
            options.put("name", "Shopping Cart")  // to put name
            options.put("description", "Quality products at affordable price.")     // put description
            options.put("theme.color", "#1F4FE0") // to set theme color
            options.put("currency", "INR") // put the currency
            options.put("amount", amountValue)    // put amount
            /*val retryObj = JSONObject()
            retryObj.put("enabled", true)
            retryObj.put("max_count", 4)
            options.put("retry", retryObj)*/
            val prefill = JSONObject()
            prefill.put("email","boltuix@gmail.com")   // put email
            prefill.put("contact","123457891")    // put mobile number
            options.put("prefill",prefill)

            checkout.open(context, options) // open razorpay to checkout
        } catch (e: Exception) {
            Toast.makeText(activity, "Error in payment: " + e.message, Toast.LENGTH_LONG).show()
        }
    }
    override fun onPaymentSuccess(p0: String?) {
        Toast.makeText(context, "Payment Successfully:", Toast.LENGTH_LONG).show()
        //Toast.makeText(context, "" +p0, Toast.LENGTH_LONG).show()
    }
    override fun onPaymentError(p0: Int, p1: String?) {
        Toast.makeText(context, "Error in payment: ", Toast.LENGTH_LONG).show()
        //Toast.makeText(context, "$p0 : $p1", Toast.LENGTH_LONG).show()
    }
}
..
Sample Screenshot:
..
Tags:
Android


